High-quality mechanical keyboards, like those from Durgod, are built to last many years. Yet, it’s crucial to recognize that the accumulation of dust and dirt poses a significant risk to their longevity, often before any mechanical or electronic issues arise. Regular mechanical keyboard cleaning is vital for preserving your keyboard’s functionality. This guide outlines three levels of keyboard cleaning, from routine maintenance to deep cleaning, ensuring your keyboard remains in prime condition.
Routine Keyboard Cleaning Tips / Preventive Maintenance
Engaging in regular, light cleaning of your keyboard is essential, particularly for those who eat at their desks. Over time, dust and food particles can accumulate on the metal plate beneath the key switches, complicating cleaning efforts once they adhere.
- Disconnect Your Keyboard: Ensure your keyboard is unplugged or powered off before starting the cleaning process.
- Vacuum Dust Off: Use a vacuum to remove dust from the plate. A gentle press of the vacuum’s nozzle on the keycaps, depressing each key, offers thorough cleaning. Opt for small handheld vacuums, especially models without rotating brushes, to prevent damage.
- Wipe with a Microfiber Cloth: Clean the keyboard’s surface with a slightly damp microfiber cloth to remove remaining dust and oils.
- Dry Thoroughly: Use another dry microfiber cloth for drying. Refrain from using paper towels, which can leave residues and minor scratches.
Canned air is not recommended for keyboard maintenance due to potential risks like condensation and forcing dust into switches. Vacuum cleaners, which use room-temperature air to extract particles, are a safer alternative.
Deep Cleaning Guide
For more thorough cleaning, especially to tackle stubborn grime and accumulated oils, a deeper approach is necessary.
- Disconnect the Keyboard: Always start by ensuring the keyboard disconnects from any power source.
- Remove Keycaps: Use a keycap puller to gently remove the keycaps. Be cautious with larger keys equipped with stabilizing wires.
- Clean Keycaps: Soak keycaps in warm, soapy water or use denture tablets for effective cleaning. Rinse thoroughly and allow them to air dry completely before reattachment.
- Clean the Keyboard Plate: Use a soft-bristled brush or dry cloth to clean the plate, avoiding pushing debris into the switch stems.
- Vacuum Thoroughly: A handheld vacuum or hose attachment can help remove loosened dirt. For stubborn areas, lightly dampen a cloth or Q-tip for spot cleaning, ensuring no moisture enters the switches.
Advanced Cleaning for Heavily Soiled Keyboards
This level of cleaning is suited for keyboards that have seen extensive use or neglect and may require disassembly for a comprehensive cleaning. Be mindful that proceeding with such in-depth cleaning could void the warranty.
- Deep Clean Keycaps: An ultrasonic cleaner can effectively remove grime from keycaps. If unavailable, revert to soaking in soapy water.
- Disassemble and Clean the Case: Carefully open the keyboard case, organizing screws for easy reassembly. Clean the case with a damp cloth or brush as needed, depending on the level of dirt.
- Reassemble and Test: After ensuring all parts are dry, reassemble the keyboard. Test all keys to confirm functionality.
Conclusion
Maintaining your mechanical keyboard through regular and thorough cleaning is key to its performance and longevity. Whether performing routine maintenance or undertaking a deep clean, these steps will help preserve your keyboard’s quality, ensuring it continues to provide an optimal typing experience.
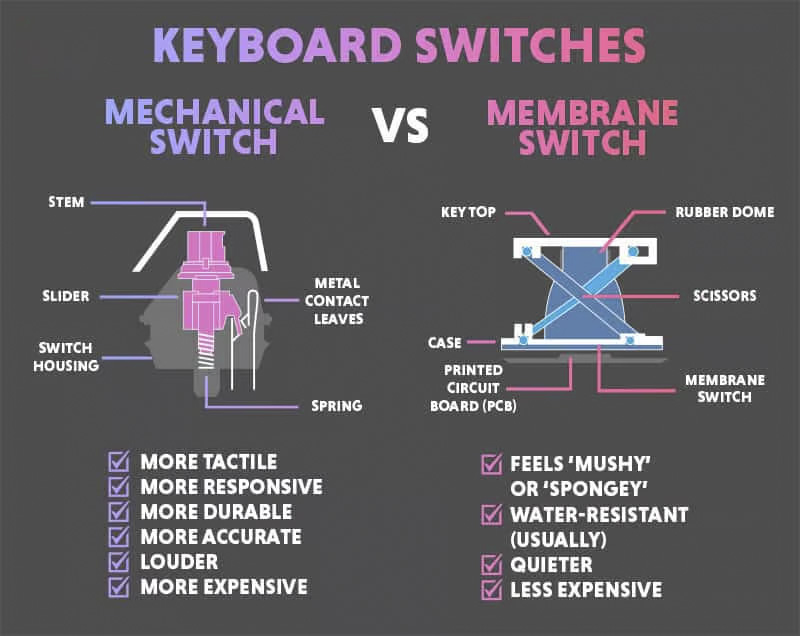
For more knowledge of mechanical keyboards, visit DURGOD.